Before you can calibrate and record, Motionprint Ergo needs to find your Xsens Awinda sensors and know which body segment each one is attached to. This guide covers the guided hardware setup screen you'll see at the start of every recording session, and how to resolve the connection issues that come up most often.
1 What you need
Live recording requires an Xsens Awinda dock and the sensor set you're using, connected to the machine running Motionprint Ergo. Make sure the dock is connected and powered before you start hardware setup, and that the sensors you plan to use are charged and within range.
Where each sensor sits on the body matters for accurate tracking. Xsens's own video walks through preparing and placing MVN Awinda hardware correctly: Preparing Hardware (MVN Awinda).
2 Scanning for sensors
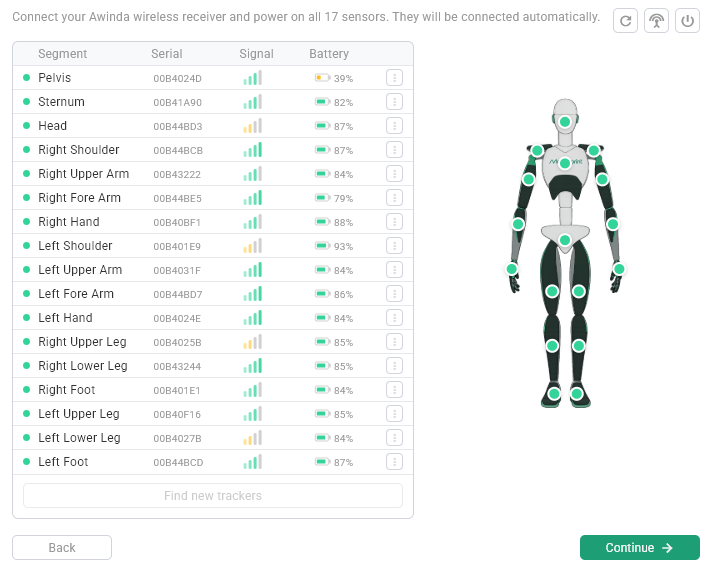
The hardware setup screen scans for sensors connected to the dock and lists each one it finds. From here you can confirm which sensors are detected before moving on to assigning them to body segments.
- If a sensor doesn't appear in the scan, check that it's powered on and within range of the dock
- A low battery can cause a sensor to drop out mid-scan or mid-recording — charge sensors fully before a session
- If a sensor connects late, or after you've fixed a connection issue, click Refresh to rescan without leaving the screen
Setting a radio channel (optional)
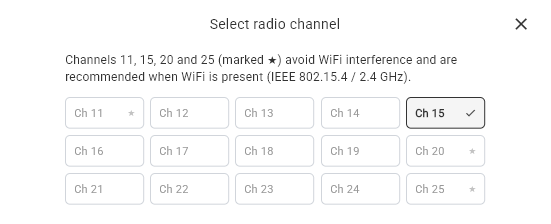
Awinda sensors talk to the dock over a 2.4 GHz radio link, which can run into interference from nearby Wi-Fi or another Awinda dock in the same room. If you notice repeated dropouts, open the radio channel setting next to Refresh and pick a different one. 15 channels are available (11 through 25); channels 11, 15, 20 and 25 are marked as recommended, since they sit in the gaps between Wi-Fi channels and avoid that interference. This setting needs at least one sensor connected and an active Xsens SDK licence to open.
3 Assigning sensors to body segments
Once sensors are detected, Motionprint Ergo automatically assigns each one to the body segment it's physically attached to (for example, pelvis, upper arm, or foot), based on how the sensor reports itself to the dock. This assignment is what lets Motionprint Ergo map raw sensor orientation onto the correct part of the skeleton during calibration and recording. You don't need to do anything here yourself — see the next section if you ever need to change an assignment by hand.
4 Automatic allocation vs. manual override
Sensor-to-segment assignment happens automatically, as described above, based on how each sensor reports itself to the dock. Manual override exists for the cases where that's not enough to rely on — for example if a sensor ends up on the wrong segment after swapping sensors between straps, or if a sensor breaks mid-session and needs to be swapped out. It's not something you'd normally use, but it's there when an assignment needs correcting by hand.
How manual allocation works
Each assigned sensor in the list has a Remove from segment control. Removing a sensor doesn't disconnect it — it moves the tracker into an Unassigned group at the bottom of the list, still connected but not mapped to any body part. From there, click Allocate on the unassigned tracker to open the Choose segment dialog, which lists only the body segments that don't currently have a sensor. Pick one, and the tracker is assigned to it.
If a sensor is connected to the dock but hasn't shown up in the list yet, Find new trackers looks for it without running a full rescan.
This is also how you'd recover from a broken sensor: remove the faulty one from its segment, connect its replacement and click Refresh (or Find new trackers) to detect it, then Allocate the new tracker to the now-empty segment.
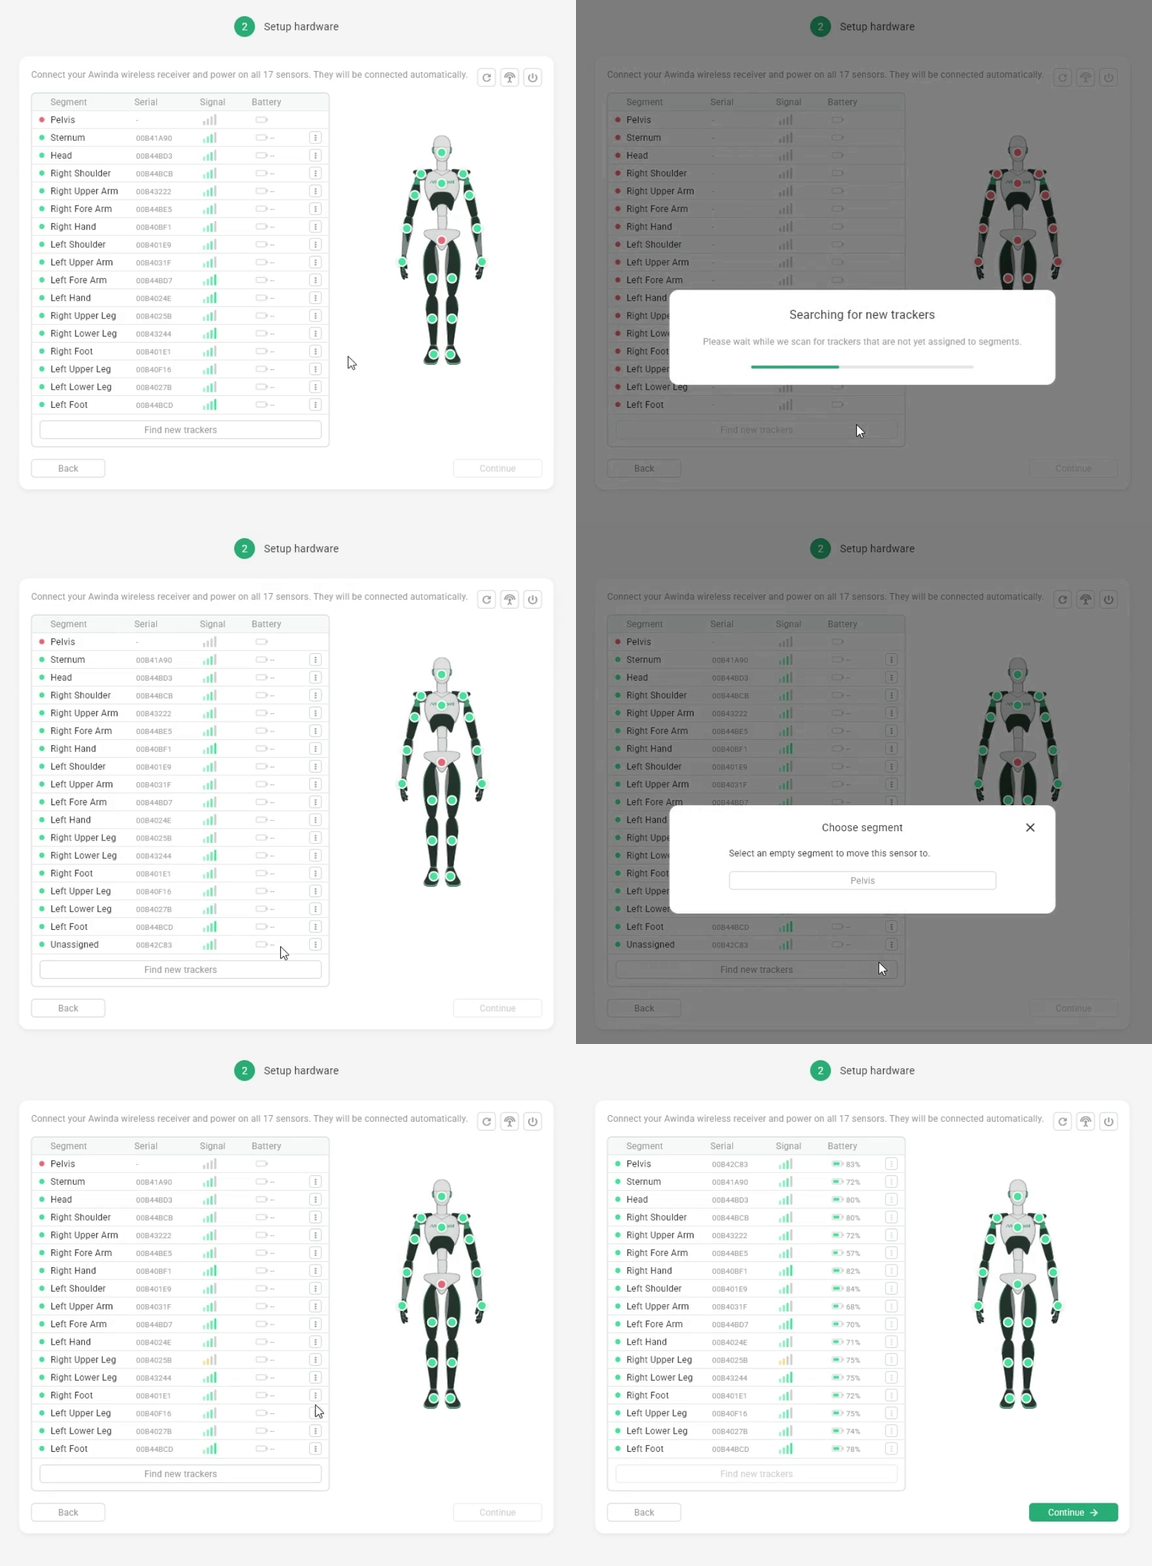
A wrong segment assignment won't be obvious until calibration or recording, where it shows up as an oddly bent or implausible skeleton. It's worth confirming every assignment on this screen before moving on.
5 Resolving duplicate-tracker conflicts
If two sensors end up assigned to the same body segment — for instance if a sensor from a previous session wasn't cleared, or two units are reporting similar identifiers — Motionprint Ergo flags this as a duplicate-tracker conflict and won't let you continue until it's resolved. The setup screen highlights the conflicting segment so you can reassign one of the sensors to its correct location, or remove the one that shouldn't be part of this session.
6 Common connection issues
| Symptom | Likely cause |
|---|---|
| Sensor not found in scan | Sensor powered off, out of range of the dock, or battery depleted |
| Sensor drops out during recording | Low battery, or the sensor moved out of the dock's range |
| Frequent dropouts in a Wi-Fi-heavy environment | Awinda radio channel overlapping with nearby Wi-Fi or another dock — set a different radio channel, preferably 11, 15, 20 or 25 |
| Duplicate-tracker conflict | Two sensors assigned to the same body segment |
| Skeleton looks wrong after calibration | A sensor assigned to the wrong body segment |
If sensors keep dropping out, try moving the dock closer to where the subject will be performing the task, and confirm no other Awinda dock nearby is competing for the same sensors.
With hardware set up and every sensor correctly assigned, you're ready to calibrate — see Calibrating Your Sensors.