Every recording captured live in Motionprint Ergo can be reviewed in its own recording viewer before you use it in a report. This guide covers opening the viewer, trimming a recording down to the part of the capture you actually want to assess, and editing its task markers.
1 Opening the recording viewer
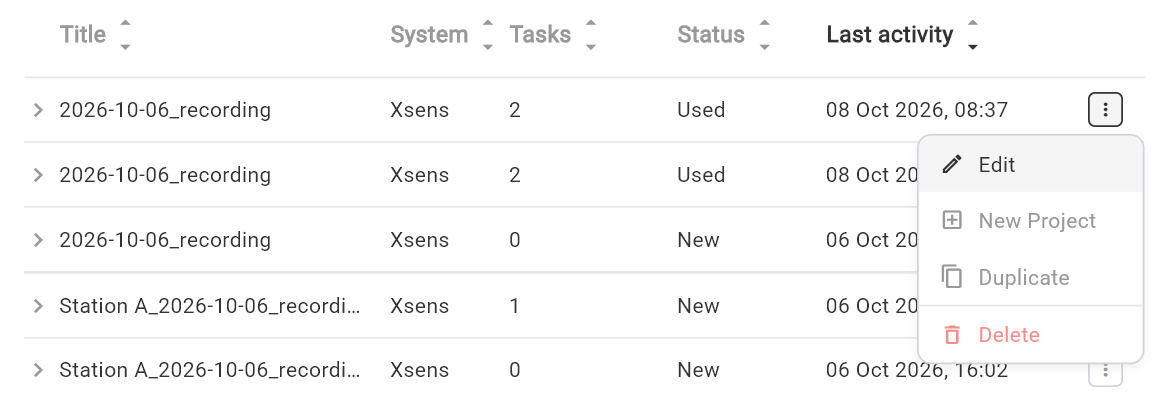
Open the Recordings Database, find the recording you want to review, and click the kebab menu (the ⋮ icon) on its row, then choose Edit. There's no other way into the recording viewer — clicking the row itself just expands its details panel. This opens the same 3D playback experience used elsewhere in Motionprint Ergo, applied to a raw recording rather than a finished report.
2 Reviewing the recording
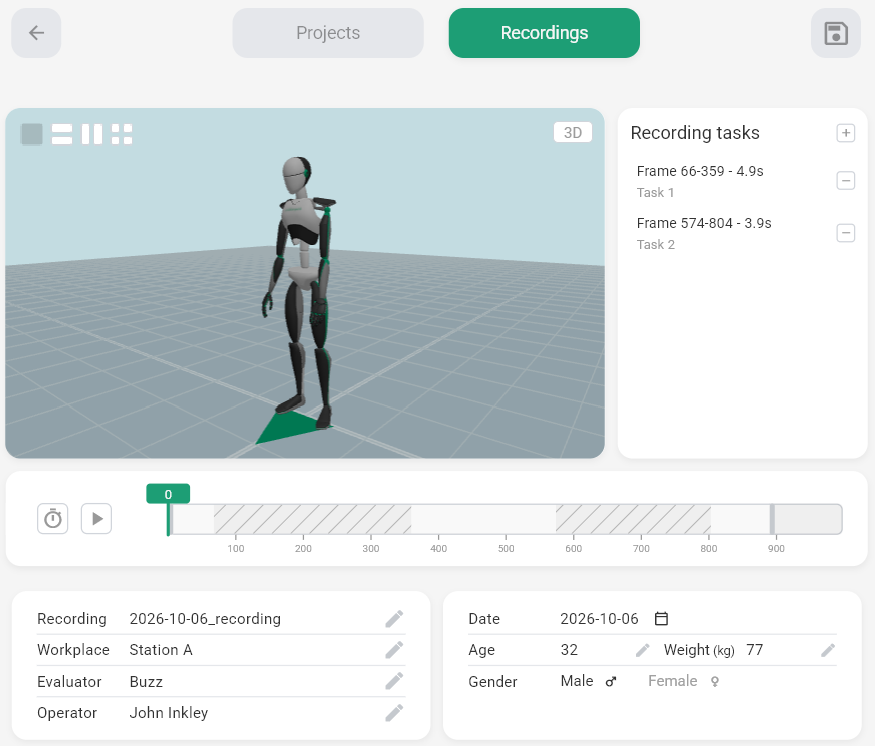
The recording viewer uses the same 3D viewport, camera view selector, and playback controls as the rest of Motionprint Ergo — see 3D View & Interface Controls for the full rundown of mouse and keyboard navigation, the camera presets, and the play/pause, speed, timeline, zoom and pan controls.
Use these controls to locate the exact moments where the task begins and ends, or to review a specific posture more closely before deciding what to trim.
3 Trimming a recording
A live recording often includes a few seconds before and after the actual task — walking into position, pausing at the start, or stepping away at the end. Trimming lets you narrow the recording down to just the section you want to assess, without needing to re-record.
- Locate the start and end points of the task on the timeline — on a long recording, scroll your mouse wheel over it first to zoom in for frame-precise placement
- Drag the trim handles to mark the section you want to keep
- Play through the trimmed range to confirm it before saving

Trimming sets the range of the recording that's used going forward — it doesn't delete the rest of the capture outright. If you need a different range later, you can reopen the recording and adjust the trim again.
What to trim out
As a general rule, trim out anything that isn't representative of the task itself: walking to and from the workstation, waiting for an instruction, or adjusting equipment before starting. Keeping the recording focused on the task improves the accuracy of critical-moment detection in RULA reports and keeps NIOSH and KIM-LHC inputs limited to the relevant lift or handling activity.
4 Editing tasks
Markers are set during live recording: each Start marker and Stop marker pair becomes a task. In the recording viewer you don't set markers — the recording's tasks are already known and listed in the Recording tasks panel next to the viewport, each with its frame range, duration and description. Here you can edit them:
- Click a task to change its description or its start and end frame
- Click + to add a task — select a range on the timeline first to fill in its start and end frame
- Click − next to a task to remove it
- A task's range must stay within the current trim range, and can't overlap another task
Each task becomes a lifting moment or posture task when you use this recording as input for a NIOSH, KIM-LHC or RULA report, so it's worth getting its range right here, the same way you would for the trim itself.
5 Using a trimmed recording in a report
Once you're happy with the trim, the recording is ready to use. When creating a RULA, NIOSH or KIM-LHC report, choose Use a Xsens recording made within this app on the Input Source page instead of uploading an .mvnx file, and pick this recording from the list — or use New Project in the recording's action menu in the Recordings Database. The report uses the trimmed range, along with the recording's tasks.
6 Saving your changes
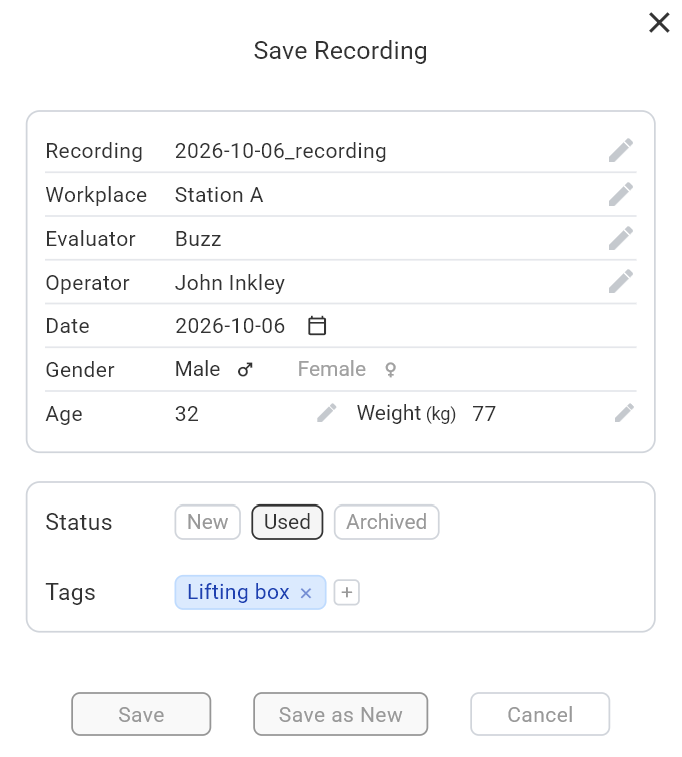
Click Save to store your trim and task changes against the recording. This opens the Save Recording window, pre-filled with the recording's current values — title, workplace, evaluator, operator, date, gender, age and weight, plus its status (New, Used or Archived) and tags.
If you'd rather keep the original recording untouched, choose Save as New instead: it clones your trim and task edits into a new entry in the Recordings Database and leaves the recording you opened exactly as it was.
Either way, the recording keeps its place in the Recordings Database, and any report you've already created from it is unaffected — a report keeps the data it was created with, the same way a saved project keeps its own settings snapshot.
With your recording trimmed to the relevant section, select it as the input for your next report — see the Recordings Database for how to find it again later.