This article walks through the complete process of running a RULA assessment in Motionprint Ergo — from selecting the report type to clicking Process. Every screen, field, and control is covered in the order you encounter them, for both ways of providing motion data: uploading an .mvnx file, or selecting a recording made in Motionprint Ergo.
1 Overview
A RULA assessment in Motionprint Ergo spans three separate screens and five numbered steps. The table below shows the complete flow:
| Step | Label in the app | Screen |
|---|---|---|
| 1 | Select the report you want to create | Create page |
| 2 | Select your input source | Input Source page |
| 3 | Setup your input source | Input Source page (same screen) |
| 4 | Trim the file and specify posture tasks | Input page — 3D viewport on left, posture tasks on right |
| 5 | Provide task information | Input page (same screen, scrolls down from step 4) |
After completing all five steps, the Process button at the bottom of the input page becomes active. Clicking it submits the assessment and navigates you to the report.
If you stop a live recording and choose New Project in the Save Recording window, then pick RULA, steps 1 to 3 are skipped: you land directly on the input page with the recording's trim range, tasks and metadata already filled in. See Record Xsens Data Live.
2 Select Report
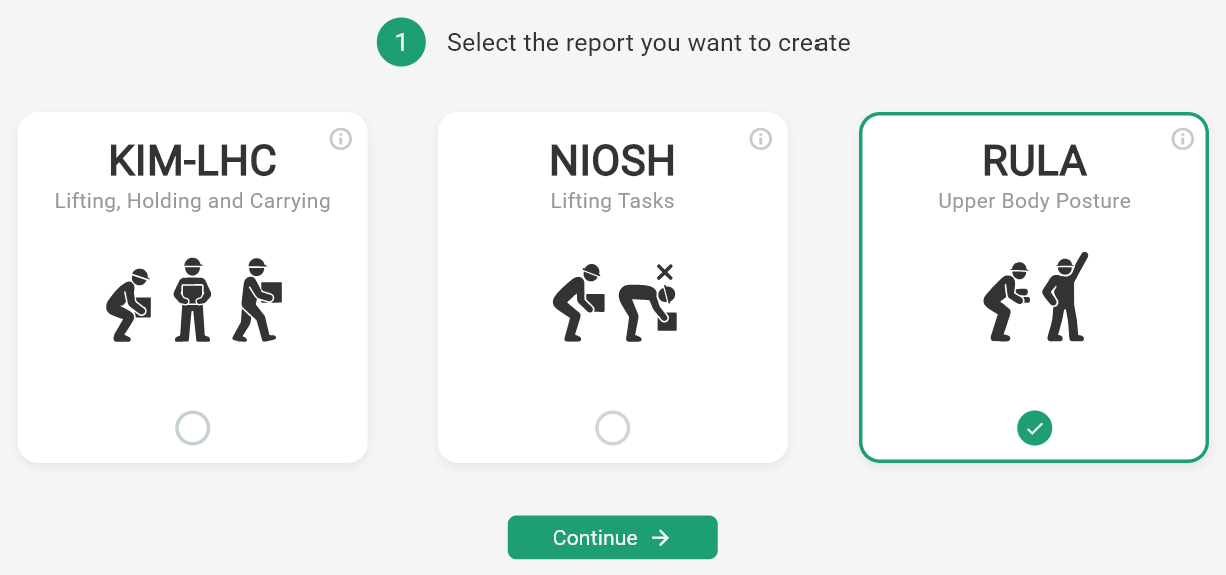
The assessment begins on the Create page, where you choose which type of report to run. Select the RULA tile from the available options, then click Continue to proceed to the next step.
RULA assesses upper-body posture. If the task is fundamentally about lifting a load, NIOSH or KIM-LHC will tell you more. Nothing stops you running both on the same recording — they answer different questions, and a task can easily be acceptable under one and problematic under the other.
3 Select Input Source
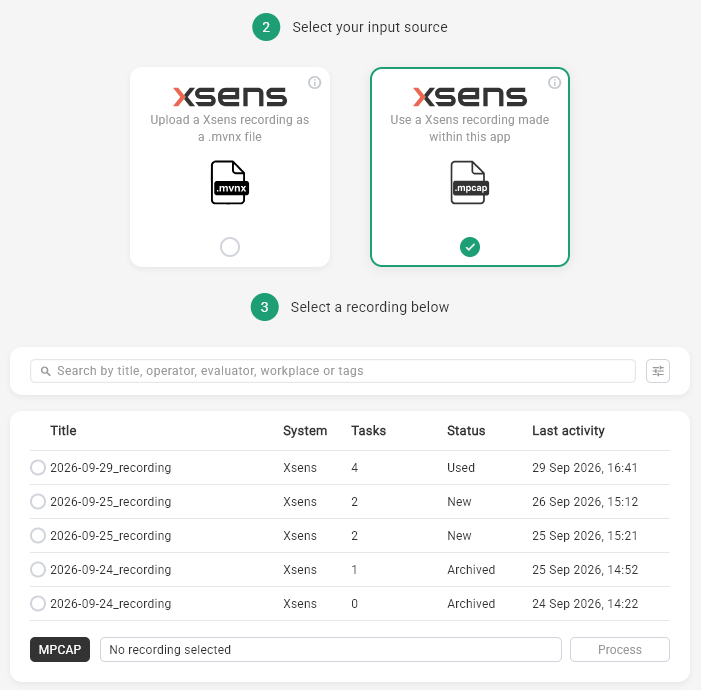
The next screen is the Input Source page, where you choose where the motion data for this assessment comes from. Two tiles are available:
| Tile | Use it when |
|---|---|
| Upload a Xsens recording as a .mvnx file | You recorded the task in Xsens MVN Analyze and exported it as an .mvnx file. |
| Use a Xsens recording made within this app | You recorded the task with live recording in Motionprint Ergo, so it is stored in your Recordings Database. |
Whichever you choose, the RULA calculation runs exactly the same way. See .mpcap vs .mvnx Explained for how the two formats compare.
4 Setup Your Input Source
What happens next depends on the tile you chose.
Uploading a .mvnx file
A file browser opens. Navigate to your .mvnx file and select it. Motionprint Ergo runs a quick structural check, and once the file passes it takes you to the main input page (steps 4 and 5). If the file is invalid or corrupted, an error message tells you what is wrong and you can select another file.
Before importing, export your session from Xsens MVN as a MVNX file. This format preserves all motion data and skeletal information needed for analysis. For a full walkthrough of the export and upload process, see Uploading & Processing Xsens Data.
Selecting a recording
A list of your saved recordings appears, laid out like the Recordings Database and with the same filters to help you find the right one. Archived recordings are included in the list; use the filter to hide them if you prefer. Select the recording you want to assess to continue to the main input page. No validation step is needed, because the recording was captured and checked by Motionprint Ergo itself.
Everything you prepared in the recording carries over to the input page:
- Trim range — becomes the observation window for the assessment.
- Tasks — every task defined in the recording appears as a posture task, with its start frame, end frame and description.
- Metadata — workplace, evaluator, operator, age, gender, weight, tags and date are pre-filled. The date defaults to the date of the recording.
What a recording can't hold is the RULA-specific information per task, such as the load weight, arm support / leaning and shock / rapid build-up of force. You fill that in per task on the input page.
Anything you change on the input page — the trim, tasks or metadata — applies only to this project. The recording itself stays exactly as it was saved in the Recordings Database, so you can use it again for another report. To change the recording itself, edit it in the recording viewer; see Reviewing & Trimming Recordings.
5 Trim the File and Specify Posture Tasks
This is the main input page — a new screen with a 3D viewport on the left showing the loaded avatar and a posture tasks panel on the right. If you selected a recording, the observation window and posture tasks are already set from that recording; review them here and complete the RULA-specific fields for each task. Otherwise, this step is where you define the observation window and mark each working posture you want assessed.
The 3D viewport and playback controls
The viewport renders the motion capture recording as an animated 3D avatar, with the same camera views (3D, front, side and top) and playback controls used elsewhere in Motionprint Ergo:
- Play/pause button — Start or stop the animation.
- Speed selector — Choose playback speed: 0.5× (half speed), 1× (normal), 2× or 4×.
Below the playback controls is the timeline — a horizontal bar representing the full duration of the recording. You use the timeline to trim the recording and mark posture tasks. On a long recording, scroll your mouse wheel over it to zoom in for frame-precise placement. For a full overview of the viewport controls and navigation, including zooming and panning, see 3D View & Interface Controls.
Trimming the observation window
The observation window defines which portion of the recording is included in the assessment. Anything outside the trimmed range is ignored.
Two draggable vertical handles appear on the timeline:
- Start handle (left) — Drag to set where the observation period begins.
- End handle (right) — Drag to set where it ends.
The region outside the two handles is shown in a shaded colour, indicating that part of the recording is excluded from the assessment. As you adjust the handles, Motionprint Ergo automatically recalculates how often the posture occurs — the number of posture tasks divided by the trimmed duration in minutes. That rate determines whether the work counts as repetitive, which adds a muscle use point to the score.

At 4 or more occurrences per minute the action counts as repetitive and a muscle use point is added. Example: 5 posture tasks in a 1-minute window gives 5/min — repetitive. The same 5 tasks across 2 minutes gives 2.5/min — not repetitive. The flag applies to the whole report rather than to individual tasks, so widening or narrowing the observation window can change it.
The trim range of a recording was set in the recording viewer, possibly before you knew which method you would use it for. Because the repetition rate is calculated from the trimmed duration and the number of tasks, check whether the work is still flagged as repetitive (4 or more per minute) the way you expect. If it doesn't, adjust the handles here — the change only applies to this project.
Defining posture tasks
A posture task is a distinct working posture within the observation window. Each task is defined by a start frame and an end frame. Tasks must have a minimum duration of 1.0 second. Overlapping frame ranges between tasks are not permitted. To add one:
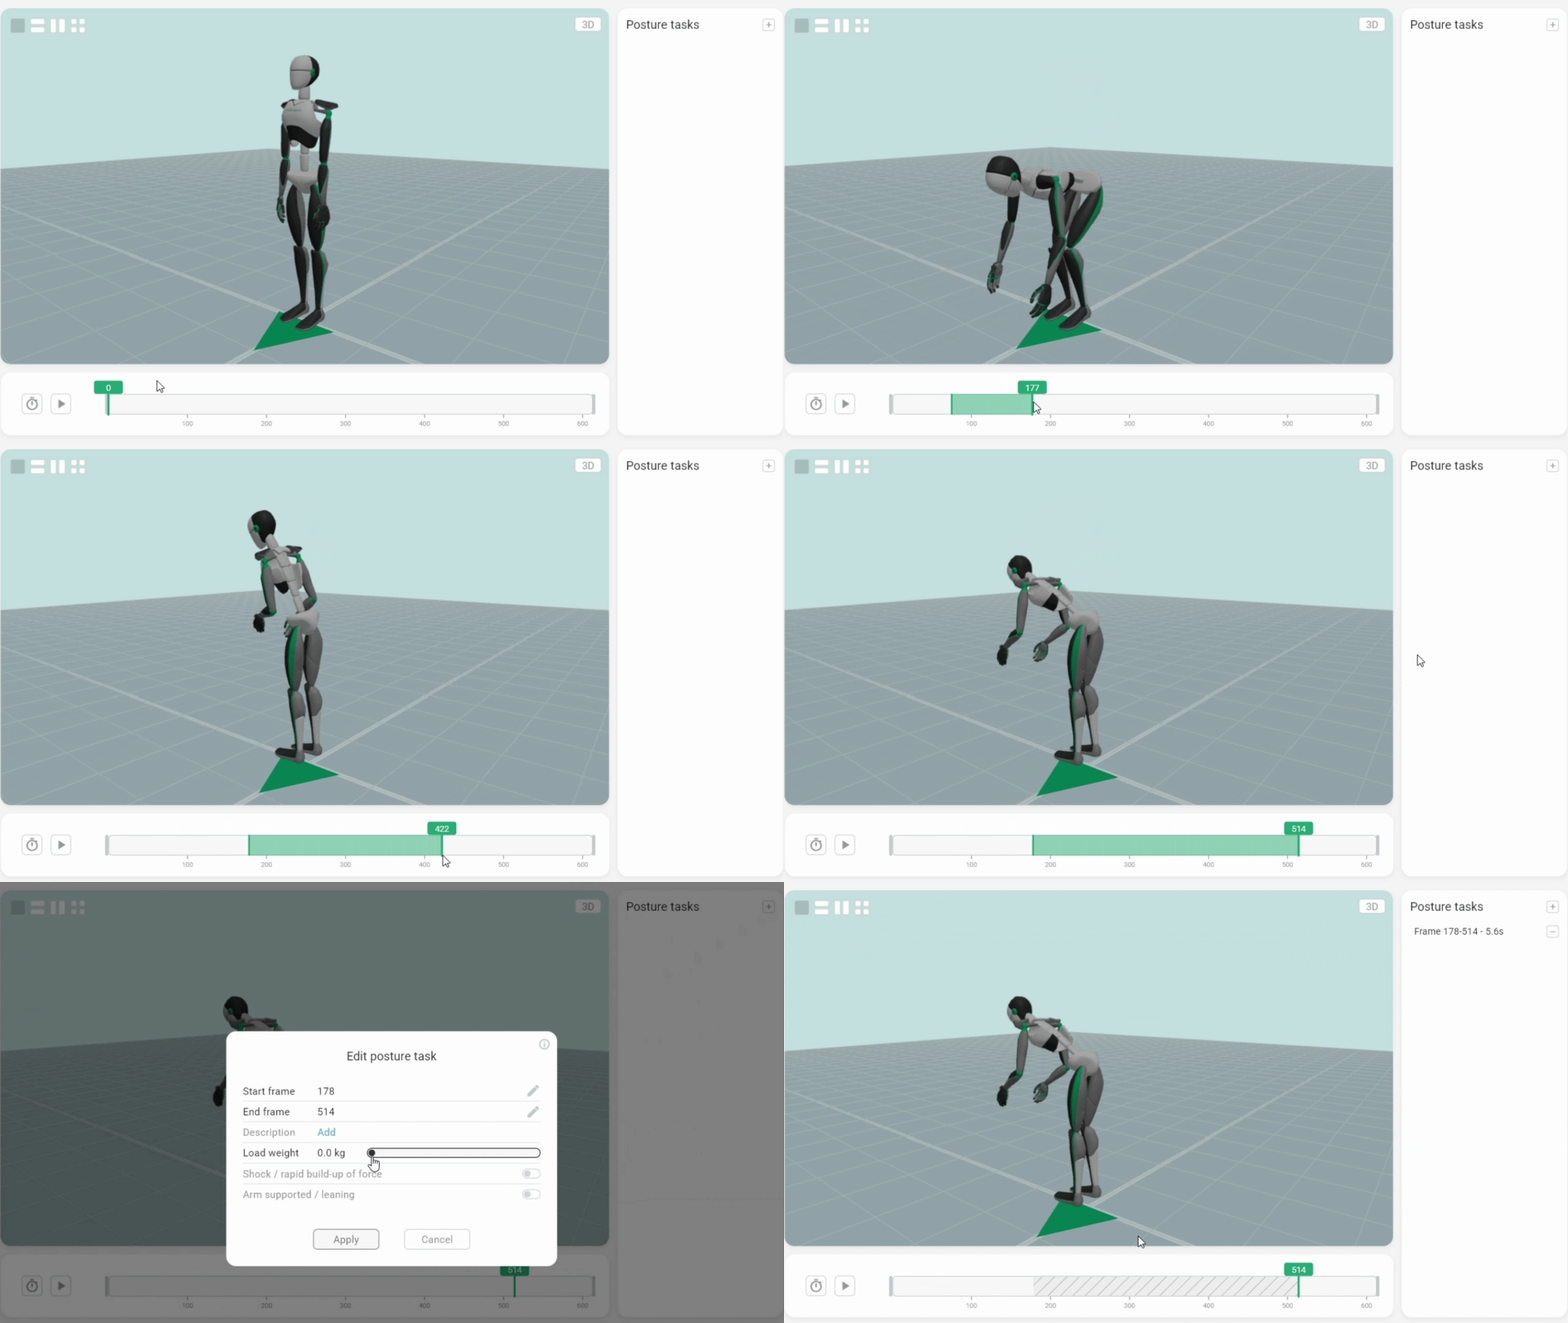
- Click and drag on the timeline to highlight a frame range. The selection is shown in the branding colour configured in your settings.
- Click the + button to create a task from that range.
- The task appears in the list on the right. Fill in the required fields:
- Start frame — Auto-populated from your selection; editable.
- End frame — Auto-populated from your selection; editable.
- Description — A label for the task in the report.
- Load weight — Weight handled during the posture, in kilograms.
- Arm support / leaning — Whether the arm is supported or the person is leaning on it.
- Shock / rapid build-up of force — Whether force is applied with impact.
| Field | What it affects |
|---|---|
| Arm support / leaning | Subtracts 1 point from the upper arm score. The result is floored at 1, so support cannot reduce an already-minimal score any further. |
| Shock / rapid build-up of force | Forces the maximum 3 force/load points regardless of the weight entered. Set this when force is applied with impact — hammering, snapping a part into place, absorbing a tool's torque reaction. |
Tasks from a recording are already in the list when you arrive, with their start frame, end frame and description filled in. Open each one and complete the load weight, arm support / leaning and shock / rapid build-up of force — these are specific to RULA and are not stored in the recording.
You can edit or delete tasks in the list at any time. If you adjust the trim handles to exclude a task's frame range, that task is removed or adjusted automatically.
RULA adds the force/load points to the arm and wrist total and to the neck, trunk and legs total. A single change to the load weight — or enabling the shock flag — can therefore move the final RULA score by more than one point.
Multiple posture tasks
If you define two or more posture tasks, each is scored independently and reported separately, with its own RULA score and its own peak frame. You switch between them within the report.
If every task represents the same repeated posture, you can enable Generate averaged overview in your RULA report settings to add an averaged result alongside the individual ones. Leave it off when the tasks describe genuinely different postures.
6 Provide Task Information
Still on the same input page, scrolling below the timeline and task list brings you to the task information form. This collects metadata about the assessment session. Some fields are always shown; others appear or are hidden based on your privacy settings.
If you selected a recording, the metadata fields are pre-filled from that recording — workplace, evaluator, operator, age, gender, weight, tags and date. Review them and fill in anything that is still empty; as with the trim and tasks, changes here apply only to this project.
| Field | Required? | Description |
|---|---|---|
| Workplace | No | Name or description of the workstation being assessed (e.g. "Assembly Line Station 3"). This field is always visible and cannot be hidden in settings. |
| Evaluator | No | Name or ID of the assessor. Can be hidden via the privacy settings. |
| Operator | No | Name or ID of the worker being assessed. Can be hidden via the privacy settings. |
| Gender | No | Worker gender (Male / Female). Can be hidden via the privacy settings. |
| Age | No | Age of the worker being assessed. Can be hidden via the privacy settings. |
| Weight | No | Body weight of the worker being assessed. Can be hidden via the privacy settings. |
| Date | Yes | The evaluation date. Defaults to today's date, or to the date of the recording when you selected a recording as input. Can be changed. |
7 Processing the Assessment
Once all required fields are filled and at least one posture task is defined, the Process button at the bottom of the input page becomes active. Click it to submit the assessment. If anything is still missing, the app lists exactly which items to complete rather than showing a generic error.
A loading overlay appears showing progress and current status as the RULA calculation runs. Every frame of every posture task is scored, for both sides of the body, and each task is then reduced to its peak frame. Once complete, Motionprint Ergo automatically navigates to the report view, where you can review the Score Overview, Analysis, and Findings tabs. For a full walkthrough of every section in the report, see Reading the RULA Report Results.
If an error occurs during processing, an error message is displayed. You are returned to the input page where you can correct the issue and try again.
Making changes after processing
If you are on the report page and want to adjust any input — tasks, task information, or general info — click the Edit button on the report page. This returns you to the input page with all your existing settings intact, so you can make changes and re-process without starting over.
Once you're happy with your results, click Save Project to store the assessment in the Projects Database for future reference. If you used a recording as input, it stays in the Recordings Database unchanged, ready to be used for another report. You can archive completed projects or delete duplicates to keep your library organized. See Projects Database for details.